Deploy Go app to the best Heroku alternative

NodeChef is a Cloud PaaS that runs on Bare metal and the best alternative to Heroku if you want the best price to performance ratio. NodeChef also comes bundled with MongoDB, MySQL, PostgreSQL and redis databases. Unlike Heroku, there is no need to use third party addons for any of this. You can easily deploy your Go app written with any framework together with your database while saving cost and improving on performance.

NodeChef uses the Cloudfoundry Go buildpack to build and package your Go apps.

Visit the Go hosting page to review all the features provided by NodeChef

This article will provide a general guide on how to deploy your Go app by using the NodeChef CLI, connecting and using your repository from GitHub, Bitbucket or GitLab or zip your Go project folder and then uploading it from the dashboard.

  • 1
    Create your Go app

    Log in and navigate to the Dashboard. Click on deployments and complete the form. You will be required to select the size of your container and the region where your cluster is to be hosted. You can also choose to create your Go app with a MySQL, MongoDB or PostgreSQL database.

    Once the cluster is provisioned, a URL will be assigned to your project which will be displaced on the dashboard.

    Create your application on NodeChef
  • 2
    Prepare your Go app for deployment

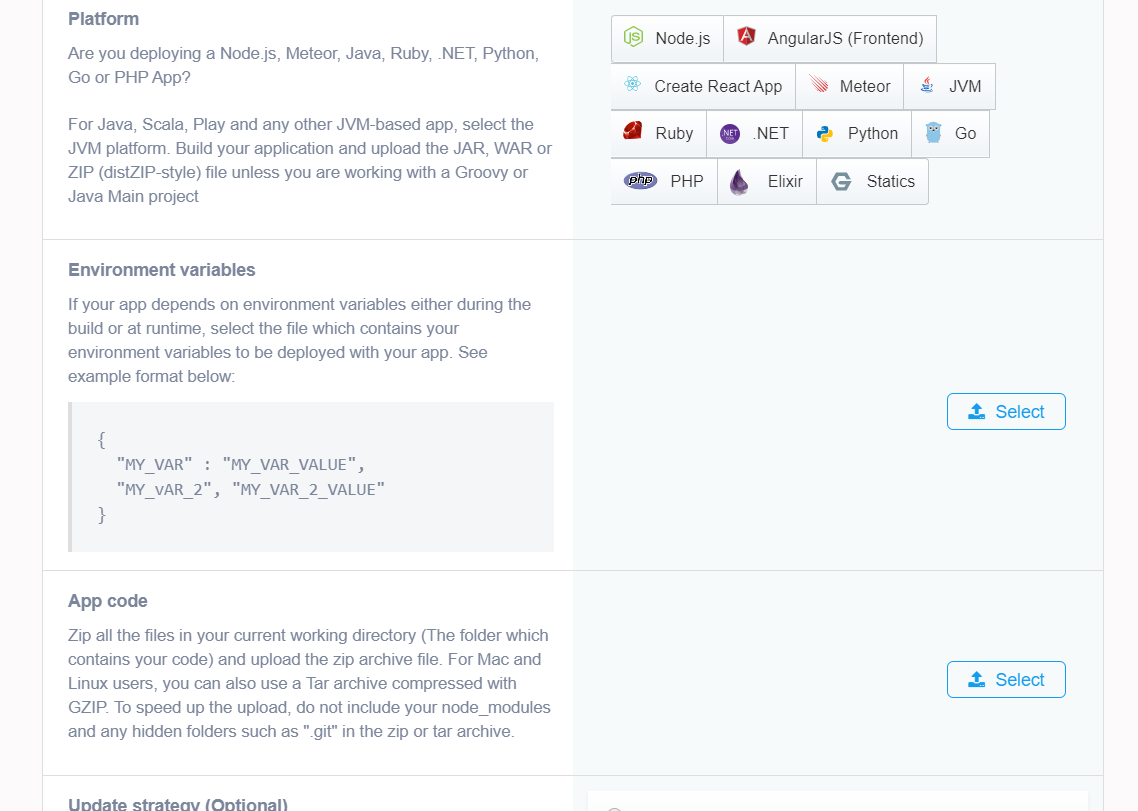
    Notes on Golang projects.

    NodeChef automatically detects your project as Golang if you do not explicitly specify if one of the below conditions is met.

    • Your project has been packaged with godep using godep save.
    • Your project has a vendor/ directory and has any files ending with .go.
    • You have set the GOPACKAGENAME environment variable and your project has any files ending with .go. Note, if you are not using any vendering tool, you must set the environment variable GOPACKAGENAME for the deployment to work.
    • Your project has a glide.yml file in the root folder.
    • Your project has a Gopkg.toml file in the root folder.
    • Your project has a go.mod file in the root folder and you are using the go mod init vendering tool.

    Start command.

    Because Golang apps compile to a single file native binary, by default your project will be started with the build output as the command. You can override this behaviour by using a Procfile created in the root directory of your project. See example Procfile:

    web: unicorn-go-backend

    When Your Main Package is Not in the Project Root

    A common project pattern is to place main packages in a subdirectory called cmd like in the example below:

    app-package-name ├── cmd │ ├── cli │ │ └── main.go │ └── server │ └── main.go ├── go.mod ├── go.sum ├── shared.go ├── shared_test.go └── manifest.yml

    In this case, you must set the environment variable GO_INSTALL_PACKAGE_SPEC. For example, if the module name for the project is github.com/superd/app-package-name, the value of the environment variable will be github.com/superd/app-package-name/cmd/server.

  • 3
    Deploying your Go app.

    You can deploy your Go app to NodeChef cloud hosting by uploading your project folder as a zip, using GIT or the NodeChef CLI.


    Deploying your Go app by uploading your project folder.

    You must first zip all the contents in your project folder or use a tar archive with gzip compression to bundle all the files in your project folder. You can then upload this bundle.

    The zip or tar.gz archive cannot exceed 256 megabytes in size. You can always find the form to upload your project from the dashboard by navigating to the task manager → App actions → Upload code.

    Deploy by Uploading your project folder
    You can set your environment variables from the dashboard before deploying your app. You do not have to keep them in a JSON file as seen in the above image. See how to do so by clicking here.

    Once you click the Deploy app button, you should be able to see the status of the deployment from the progress indicator which is displayed right below the Upload form.


    Deploying your Go app from your GitHub, GitLab or BitBucket repository.

    Firstly, if you did not sign up for a NodeChef account using a GIT repo provider, you must authorize NodeChef to access your GitLab, GitHub or BitBucket account. You only have to do this once per NodeChef account. Click “Connect to (repository)”, a shown below to start the authentication.

    NodeChef select Git integration from Task manager NodeChef Github,Bitbucket & GitLab authorization

    After you link your Account to a Git repo, you can selectively deploy from branches as well.

    NodeChef Git repository


    Deploying your Go app using the NodeChef CLI.

    Install the NodeChef CLI from npm as showm below:

    npm install -g nodechef-cli

    CD into your project folder and use the below command as seen below. You will have to login from the command line to deploy or use a deployment token if you generated one from the dashboard.

    nc login nc deploy -i my_first_go_app